Tuesday, December 28, 2010

Christmas Morning Fiasco

 I hope you all had a wonderful Christmas.  We did, other than one "little" issue!  

No, the new kitten didn't climb the tree and knock it over, whew - that actually was a concern we had!

 Our kids were surprised with their gifts - they liked everything
My Mom made it here from Upstate NY to spend the holiday with us.
I actually remembered everything I needed at the grocery store.

Hmm....so for the perfect Christmas day.

This innocent looking appliance was just waiting...

 waiting for me to put in my Orange - Cranberry bread for breakfast, the first of several foods that needed to baked on Christmas day: homemade cinnamon rolls were going in second, dinner rolls and the ham for Christmas dinner.

For 15 years this WONDERFUL oven has done it's job perfectly - why did it have to pick Christmas day to go on strike?  

Here's a quick recap of the morning - I had just closed the oven door after checking on the orange cranberry bread - it had maybe 5 more minutes to bake.  No sooner than I close the door, there is a very bright light (like a welder's torch)  snapping noises and sparks  flying inside the oven.  In my state of panic I open the oven door (If I had read the manual I would have known this was NOT the appropriate course of action!)  I'm now screaming for my husband and trying to remember which side of the sink my fire extinguisher is on.  Thank goodness my husband is a little calmer than I am, he walked over, closed the oven door and waited for the show to be over.  (he did admit later that he knew I needed him immediately by my scream - it wasn't my "big spider" scream!)     
Can you tell from this picture that the element is fried?  It is completely bent out of shape and detached from the plug in.  The whole fireworks took only about 6 seconds and was contained to the oven, thank goodness, but my heart was racing for another  30 minutes!  

The dinner rolls and cinnamon rolls went into the garbage.  The ham, mashed potatoes and sweet potatoes went into crock pots instead of the oven.   A new element was ordered within minutes and I'm expecting it today. 

I've told all the other appliances that New Years Eve is going to pass by unnoticed.   

Monday, December 13, 2010

Simple Decorations

If you read my last post, you'll remember this photo.  I put all (or almost all!) of my Christmas decorations on my dining room table and decided to use only what I truly LOVE.  So I've gone from this...
 
 to this....
 Everything I didn't want ended up in a LARGE Dell computer box, ready for a garage sale or a Thrift Store. 

I decided on a simple gathering for the dining room table.  One of my handwoven baskets, layered with a large snowman candle holder, filled with a grubby candle and potpourri and a sprig of faux greenery. 
 I pretty much left the corner cupboards alone, just added a few holiday items to the baskets and books...
 A new bottle brush tree on the left and an antique one on the right - from the Fuller Brush Company
 Small cross stitch pillow and a Santa...
 another small cross stitch cupboard tuck...
 I hung my wall pocket from Karen at My Colonial Home in my grain sifter

 I made a couple of these pea hens and this one found a home in an antique wooden bowl on my stove, nestled in a faux greenery wreath with red berries.
We finally purchased our Christmas Tree yesterday, hopefully tonight I'll get that decorated.  School was cancelled here today due to snow and icy road, I love bonus days at home with the kids.

I have enjoyed looking at all of your homes decorated for the holidays.  Thanks so much for sharing.
Have a great day.  ~Ann

Wednesday, December 8, 2010

Simple Decorations Christmas 2010

Saturday I pulled out all my Christmas/Winter Decorations and filled the dining room table.  Carmen (Primcats Farmhouse) inspired me to do this.  Last year I just pulled from boxes and left lots in those boxes that never appeared in the decorating.  This is the year to clean out and put things into a garage sale box. 
I am really drawn to simple decorating - less is more.  So with that in mind here a few of my arrangements so far....


My friend Melissa from Farm Field Primitives made me this angel several years ago and I've loved her for all those years - I usually keep her up with the snowmen into February.  She's sitting in a bowl of dried black walnuts.


 I purchased this little tree back  in the spring for a great price of 75% off!  The tin bucket was a Christmas present from Sauder Village to all of us employees a few years ago, handmade by our tinsmith. 
 The little snowmen have a very mysterious way of jumping off the tree, hmm.....

 And here I was going to blame Frito for this mischief!  I see now that Frito is just sitting, but Shadow is batting! 
All I did was walk away and came back to this....


bad cat!

 Our old dining room is now the piano room.  I've added a few pieces of furniture here and am really liking the look of this room.  The spinning wheel was a gift from my Mom,  the 3 drawer dresser belonged to my Dad's parents and the desk in the corner was my great-grandfather's. 
I'm in the process of creating a make-do chair.  I'm planning on covering it in feedsacks.  I'm stumped as to how to cover the arms without having a seam run down the front.  Good Christmas project when my Mom is here over Christmas break.


 Just a few touches of Decorations.  I'm excited as there is snow on the ground here in Ohio (finally!).  I'll share some more simple decorations later in the week.  ~Ann


Wednesday, December 1, 2010

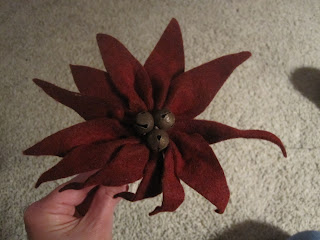
Prim Poinsettia Tutuorial

I bought a neat felt Poinsettia at a craft show and wanted to make some more to put on one of my Christmas Trees this year.  Once I figured out how to replicate the one I bought, I thought I'd share with you.   You will need:

Maroon felt or wool (ofcourse you could use white or pink!)
3 Rusty Jingle Bells
Black embroidery thread
Wire coat hanger - approx. 8"

First you will need to make your template.  I used a 3" long by 1" wide rectangle.  Round off one end with your scissors and gradually point the other end so you have a raindrop shape.

 
Cut 12 petals.

Using a 2' long piece of embroidery thread, take 2 large basting stitches through the large end of one petal.  Keep adding petals until you have all on.  Pull up your stitches to bring the petals together in a circular shape.

Don't cut your thread!  Bring thread to front and add 3 rusty jingle bells.  I anchored each bell separately, I didn't add them all on the thread and then attach.  I felt they would hold better anchored separately.


 You can add a section of wire coat hanger at this point.  Simply slip it through and anchor it under the bells in the front.  Leave the long end hanging down the back - maybe 8".  This way you can tie or wrap to your tree or wreath if you want.
Last step - spray with Walnut Ink.  Make sure to lay your flower on wax paper to protect your counters! 

My first flower is drying on the counter overnight.  I suppose you could put this in the oven at the lowest temperature - just watch to make sure it doesn't burn.

Have fun and let me know if these directions work (or don't work!) for you.

Have a good week.  ~Ann